Monday 23 January 2017

Colouring with Spectrum Noir 'The White Rabbit'


This weekend I thought id do a little valentines type card for my You tube Channel
and this was the image i decided to use, I purchased from Crafts and me 
The image is called The White Rabbit from the Artist Hannah Lynn


To colour the image I used my Spectrum Noir Alcohol markers

Ears: BGR1, CR2
Hair: BRG1,CR2, HB2
Skin: TN1, TN2, FS4, CR3
Dress: CR9, DR2, DR5, DR7, IG4, IG6, IG9
Watch: GB5, GB6, CT4, CT1, BT1, BT2, BT4
Back Ground: IB1, IB2, IB3
Little Hearts: HB1

I'm Going to write a little about the dies and things I used, I wont rabbit on to much because I don't want to bore you all ha-ha

Obviously I decided to go with a red and black colour theme for valentine or a love style card..
I was going to add a sentiment " Time stands still when I'm with you" but I thought it might be to over crowding so the sentiment didn't make the cut.

I used a tattered lace doily corners die for the details in the corners, 
then I used signature dies Classic heart edger down the side,
The paper I purchased from E-bay it was 15 sheets simply creative 6"x 6" Made With Love
the small hearts where made when i used the edger die, so thought why not squeeze them in 
some where,
and just finished off with some 2 mm gems.

Thanks for stopping by

And don't forget to check out the video

Laura x


Friday 20 January 2017

Book Art


Hello all... Today  just wanted to show you what i have been up to lately 


I made this for a friend who's Baby is due very soon (so i hope she doesn't come across this post)

How beautiful does it look?
 Its just something different and unusual, It was a friend Dena (check out her face book page she has some lovely items for sale) Dena's Designs that actually introduced me to the wonderful world of book art or book folding and i absolutely love it.. 

So how did i make this i hear you ask...

The pattern for this available to purchase from Etsy.uk the store is called LoveBookFolding
I have purchased a few patterns from this store and they are brilliant.....The instructions are so easy to follow, anyone can do them.

The link for this particular pattern is  https://www.etsy.com/uk/listing/256667774/book-folding-pattern-heart-and-baby-feet it costs only £4.80 and when you think you can make as many of these as you wanted i think that's extremely reasonable, Go over there and take a look. The pattern i purchased was in cm, but they also do them in inches, depending what measurement you like using. 


To start off with i work out my starting pages and get all the folds done
Sorry for how blurred this picture is but you can still get an idea of how it all looks

I then unfold all the pages and start working on the pattern,
Marking as and when the pattern requires.

Once I have the first part of the pattern marked, I then make all the required cuts and folds 

 
I personally find it easier to work one sheet of the pattern at a time doing all the marking, then going back to do the cutting before I start on the next page of the pattern, I also use scrap paper when I'm cutting to make sure I don't cut through the other pages (I have done that before) 


First page and second page of the pattern completed


                                                                                                    Third and Fourth page of the pattern.
Now you could just leave the book as it is, It's beautiful... but just adding a little bit of decoration you can add a real personal feel. I cover the books with some wall paper, The paper I'm using is a roll that was left over from my mum and dads bedroom, When they had theirs re papered (Sshhhh don't tell anyone!) 
                                                                        The BannerThe baby banner I made by cutting seven 2.5 cm x 1.5 cm backing, scoring at 0.5 cm across, Then adhering the letters,The Letters were die cut using the tattered lace elegant alphabet, Then glued into place onto a length of ribbon, I used some clips while the glue dried.


The Flowers

The flowers are made using the die set from signature collection by Sara Davies and are called Floral Delight In Bloom


The Pram

And to make the little pram I used a circle nest die from Sizzix, cut out a quarter of it used a pair or pinking scissors, to create the wavy edges and the x cut button dies to make the wheels, so easy and simply to do. 


All the decorations I fix into place with my Glue gun.

This is a step that can be completely missed out in all honestly, The book with the folded pages does hold its own, But just to make sure it holds its place while I'm wrapping it i do create a base for it.

For this i draw down the sides on the bottom of the book on a piece of card, from that line just drawn, measure 0.5 cm in and draw another, then from the new line just made measure 2 cm and join that.


Cut it out, score on the line that is on the inside


And put in the bottom of the book.


Then its just a case of wrapping and your all done.


From start to finish it did take roughly about two days, 
but they look so beautiful!
I'm in love with this pattern and even if you do make a mistake while cutting you don't have to through it away and start again its easy enough to sort, its very forgiving

Well that's the end of this post 
Thanks for stopping by and taking a look,
hope you enjoyed and don't for get to check out the links above.

Laura xx  


Friday 6 January 2017

Water colour resisting with heat set embossing powder


A couple of months ago i went in to my local craft store and they had some Daler Rowney watercolour paint on sale, They were meant to £15.00 and had gone down to £7.49 and you get 24 tubes of paint.. Now I'm not what you would say arty in the way of painting and free hand drawing but i thought to myself i might be able to do something with this (even if it was just making up some colour sprays with so perfect pearls or something)...so anyways they have been just sitting there for months unopened.. It was almost as if they there taunting me haha you brought me and i'm just going to sit here...
Feeling as if i had wasted my money on another useless item that was  just going to sit there i decided to try and put them to some form of use... I had played around with resisting a little while before using Elmer rubber cement and rangers distress inks, I wasn't to impressed with what was being created by myself so i guess this is where the idea came for this one..


what you will need for this and to create the card:

Watercolour paints
Watercolour paper
Paint Brushes
Water
Paper towels
Masking Tape or some kind of low tack tape
A stamp of some kind
Clear embossing powder
Versamark ink pad
ruler
Heat gun
crea-nest-lies double stitch dies or a ruler and craft knife
some gems 

I started by cutting some watercolour paper to 10.5 cm by 14.8 cm
Stamped a sentiment in some versamark pad and used paper manina clear embossing power and heat set that with my heat gun


I knew roughly what colours i wanted to use.. mixed them with a water spray with some perfect pearls (just for some added sparkle, who doesn't love a bit of sparkle on a card right!) on an old plate that was laying around. 

Taped the water colour card down with just a little bit of masking tape and just stared adding the to colours randomly.. just played about with it until i was happy.
the great thing with water colour that i found is that if you add to much simply get a paper towel, soak it up and start again, the colours bleed and blend into each other beautifully, and i just loved the finished effect it left once it was dry.. Once it is dry use a damp paper towel or baby wipe to clean some of the paint off the embossing, it will make what ever image or stamp you have used really pop and stand out.


I did decided to make this into a card using another piece of watercolour card the same size 10.5 cm by 14.8 cm and made a frame using a crea-nest-lies xxl these come in a pack of about 11 dies (i used the 3rd smallest) centred the die and ran it through my sizzix big shot. You could make the frames or border for the card with just a good old craft knife and a ruler but i was being lazy. 


Glued the frame into place, added some gems on the corners and adhered it to a base 29.6 cm by 
10.5 cm 

I really enjoyed this project it was so quick and easy and the end effect was just how i hoped it would be.. so if your looking for a quick card to make up and have some old watercolour paints laying around its really worth giving it ago. 

I think this would look great with an inspirational quote, in a frame so i will definitely be giving that ago, but for that i will have to dig out that rubber cement i threw in the back of my craft draw in rage because i couldn't get my project to work out... we've all been there.. : / 

Here are a few other cards i have made using the same technique


Thanks for stopping by 
Laura xx 


Thursday 5 January 2017

Christmas candles


I'm not going to go into to much detail on how to make these...I have already done one on candle decorating i will link the you tube video below.


Just a quick something i would like to add in the next couple of weeks i am planning and have already started to prepare for a give away i will be doing on my you tube channel on these candles but with different designs....So if you would like the chance to get your hands on one of four i will be giving away come on over to my you tube channel and subscribe as i will update it on there !!!


I just wanted to share some of the Christmas craft I was up to in December, These candles were actually Christmas Presents for my sons school teachers. 

The process of making these are exactly the same as the video.. and the images i used on the candles are from www.thepapershelter.com, and are called: The most adorable snowmen, Christmas elf and Are you ready my friend? 
The images are printed on to tissue paper, i used my laser printer.. but the do also work with an inkjet.
I have used both to make these..
Then they are coloured with my spectrum noir alcohol markers

Then heat set the image you have coloured into the wax laying grease proof paper around the candle and securing into place with clips. quick easy and simple little gifts that cost virtually nothing.    


Thanks for stopping by 
Laura xx


Christmas fun


Over the Christmas season, having my little boy off from school i wanted to try and keep him busy try and contain his excitement in the anticipation of waiting for Santa to arrive, so i planned the days out with activities to keep him entertained..all of the things i had planned didn't cost a fortune and we are all on a budget and lets face it Christmas is expensive enough without adding more to the cost....So starting with cake making and decorating, I purchased everything i wanted from the local pound store didn't spend anymore then about £6.00... I did cheat and got one of those pre-made mixes, I'm not a baker and quite frankly my cakes generally tend to taste cardboard (even when i do follow a recipe)  in all honesty he had great fun...he even wanted to share his creations with the girls from my local hairdressing salon (we had an appointment to get his hair cut in the afternoon)


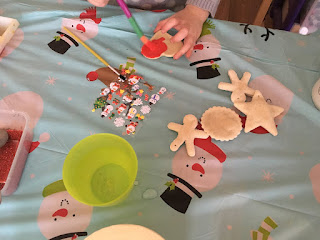
So for the second day i had invited a friend round with her children and we done salt dough decorations.. 
I had pre-made all the decorations about the week before, the recipe for this is:

Half a cup of water.
Half a cup of salt.
And a cup of plain flour

Mix together the flour and salt, and then start adding the water... keep mixing until you have something that looks like a biscuit dough..
(you could stop at this point.. add some food colouring and you have home made playdoh but would need to be stored in an air tight container)

Pre heat your oven on a low heat, make your decorations and bake for around 2-3 hours... i took mine out at around 2 hours, and i they wasn't quite baked through enough.. but this was just a bit of fun for the kids so i wasn't to fussed, but this does mean they wouldn't be any good for next year and will need to be thrown away. 

I made the kids up little bags each with a paint brush, a sponge paint dabber, some stickers and their decorations.. Put the paint in a few old ice cube trays and some glitter in plastic containers with spoons just to try and contain the mess a little.. (but i was hoovering up glitter for about a week after my son knocked one off the containers of glitter over and it went all over the floor) I covered the table with just a plastic table cloth again from the local pound shop this was so once the kids had finished.. i could take of all the stuff i wanted to keep and be reused, all the mess could be just folded in the table cloth and binned without to much messing around for a really easy clean up.. and as you can see from the pictures there was A LOT of mess but they had a lot of fun, and it kept them entertain for the afternoon. 


I know this is a little different from the normal things i would share, but as it was Christmas and having to pack all my craft things up and putting them away, i just wanted to share this with you and give you a little insight into the things i do when i'm not crafting, or writing on here. So with that said i hope you all had a fabulous Christmas with your family, friends and loved ones and would like to wish you all a happy new year. 

Laura xx


Wednesday 4 January 2017

How To Create A Ring Binder Book


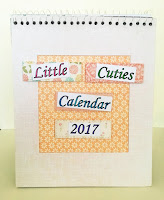
Hello.. Me again, Today I'm going to show you how i created this ring binder calendar. even through i made mine into a calendar this would easily work as a note book too. I have also made a video on how i have made this, which i have linked at the bottom of the page.


So for this you will need:


Calendar Pages 
Ruler
Pencil
A Pen or something round (the size you want your wire binding to be)
Wire Cutters
A 3mm Single Hole Punch 
A piece or card stock the same size as your calendar (This is to create a guide)
Clips 
and Post its or some low tack tape.


To start you will need to create the guide for the holes that need to be punched for the binding

To do this you will need to measure 0.5 cm from the top then 3mm do this on both sides and draw lines across with a ruler

Fold in half to find the middle
 

Then from that mark, measure and mark every 3mm and colour in every other square... these will be where you will need to punch out the holes.

Line up the hole punch to these marks and start punching.


Doing only 4 pages at a time (if you are making a note book you will be able to do more then 4 sheets of paper at one time, i could only do 4 because of the thickness of the card stock i was using) line up the guide and hold into place using the post it notes and the clips.. the post its are mainly to keep the clips from marking your pages. Do this until all of the pages are done are all done.


To Make the wire binding count the number of holes you have made and Wrap the wire around the pen a few extra times (I needed 30 so made about 33 wraps around with the wire) 
I cant remember what gauge wire i used, it was just some spare i had left from a previous project but it could have done with being a little thicker but it still done the job.


Get all of the pages into order, start to thread the wire through, It can be a little fiddly to start of with but after you have the first few holes done the wire goes in quite easily. Use the wire cutters to trim any extra wire you have left over. 


This was the first one i made, and a test for the you tube video.. (my mum loved it so she stole this one)

All the digis i used were from digi stamps boutique go check them out they have some fabulous images there!

Don't forget to check out the video


Thanks for stopping by 
Laura xx 


How To Money Wallets/Envelopes


So lately I have been busy making things for Christmas and I just wanted to share these money/gift card envelopes with you all, they are so easy and simple to make and such a great way to give your friends and family a gift and making it just that little bit more personal. 


To create the base you need two pieces of card one at 25 cm by 11 cm, score and fold this at 
14 cm
The second piece 9 cm by 11 cm, score an fold this piece at 8 cm
 use a rounded corner punch
on the 1 cm fold on the smaller piece use some double sided tape or a small amount of glue and stick the two pieces together

To decorate the front
you will need 
 card stock cut to 10.5 cm by 7.5 cm 
10.5 cm by 10.5 cm
2 cm by 8 cm
2 cm by 11 cm
 3 mm ribbon
i used a bauble x cut die
a snow flake cling stamp from hobby craft  
and some 2 mm gems

I first started by using the snowflake cling stamp and just stamping in a random pattern
 for the lilac card i used tsukineko versacolor in hyacinth and versamark ink pads for the green i used tsukineko versacolor green and versamark 

leaving those to dry i made up the 2 cm strips, spacing the ribbon and fixing the loose ends on the back with a little double sided tape

i then used my sizzix big shot to die cut the baubles and glued them to some cardstock the same colour as the base card

once the ink is dry double side tape the snowflake design you have made into place, then stick the ribbon strips you made about 5 cm from the top again with double sided tape and use some 3d foam on the bauble a stick it about halfway hanging over the edge on the shorter side. then i used a small amount of glossy accents i glued in some 2 mm gems but only to the snow flakes in hyacinth pigment ink


to create the pocket you will need the white backing this is just card stock cut to 10.5 by 13.5 cm 
and stick that into place

in the same colour as the base of the card, 5 cm by 14 cm score and fold 1 cm from the bottom, then again use the rounded corner punch, line up with the bottom and adhere into place, use a small amount of glue on both sides close to the edge and fold until it bonds

then to create the decorative strip with the snowflakes do the same as before in 13.5 cm by 3.5 cm white card stock and adhere with double sided tape into place.


And there you have it! a cute little money/gift card envelope
you could leave out the pocket completely and you have a just a cute Christmas card as well

I hope you enjoy this little tutorial
 and if you made these for anyone I would love to see what you have come up with

Thanks for stopping by 
Laura xx