I really wanted to try a new card style, something I haven't done before,
i came across these explosion cards on google a few months ago, Thought they looked way to complicated for me to do.. and i bet you need some kinda special die for the die cut machine that would no doubt cost and absolute fortune!
Well anyway using my expert investigational skills and google, i found these can actually be made out of a piece of A4 card stock, and are so so easy... the main thing you need is just your creative mind.
I didn't really use any kind of special equipment, apart from an embossing folder.. and if you have some patterned paper you could even leave that out.
To try this project you will need:
A piece of A4 card stock for your base
Some card stock or patterned paper to decorate
(i used some flower stamps, embossing powder, and a heat gun)
Double sided tape
Something to score with
A Ruler
Some scissors
and Some acetate
( If this is going to be a one time project, don't waste your money on buying a pack of acetate, you will no doubt have some laying around your house on some kind of food packaging, just make sure you wash it before you use it ha-ha)
I've included a lot of pictures in this post as just to give you the best idea of what i'm going on about.
To create the base i cut my card stock to 12 cm by 25.5 cm
Score every 6 cm,
You will have 4 scored rectangles and a 1.5 cm tab at the end
Next you need to score through the centre at 6 cm only through 3 rectangles
You will end up with the 1.5 cm tab, one rectangle and six 6 cm squares
You now need to make 3 cuts on the 6 cm score lines you made, cut down to the score line in the centre.
Then cut out the tab on the side
That is the main base made.
i found it best to decorate while it was like this but you can stick it together now.. all down to your personal preference.
In white i cut 6 squares 5.5 cm by 5.5 and one rectangle 11.5 cm by 5.5 cm
In Lilac i cut 6 squares 5 cm by 5 cm and one rectangle 11 cm by 5 cm (The lilac squares i embossed using a sizzix embossing folder)
Use some double sided tape to fix them together.
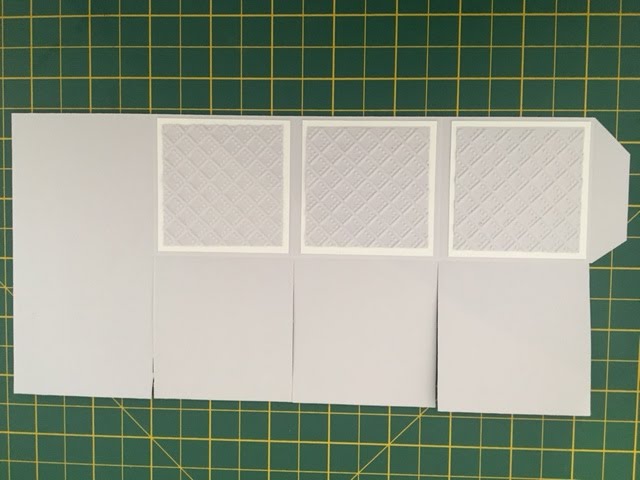
I then fixed the first panels made into place, the 3 squares where the cuts were made and the long panel all on the same side.
Turn your card base over and fix the other 3 panels into place, these need to be on the squares that have been scored not cut.
Make your box up, using some double side tape on the tab
( I had to pull back the large panel slightly to get the tab under, i should have added this panel last, but it was all trial and error)

With the main structure of the card made its time to add the decoration to the card.
For this you will need:
3 strips 1.5 cm by 8 cm, score these 1 cm at each end
and 3 pieces of acetate cut to
5.8 cm by 2 cm
5.8 cm by 3 cm
5.8 cm by 4 cm
Make these slightly smaller to the paper strip so they fit in nice and easy
Fix these on the paper strips.
Again fix the strips into the box card using some double sided tape
putting the smallest one first and the largest one at the back.
Then decorate as you like
I just used some flower stamps on different colour card stock and heat embossed them, added some little gems into the centre, and fixed them into place with double sided tape.
Then i added a sentiment, and i had a few flowers left over, so just added these to the sides.
The stamps i used are by Sheena Douglass A little Bit Sketchy.
Next onto the envelope
again using an A4 piece of card stock
Score at 7 cm, 7.5 cm, 20 cm, and 20.5 cm across the longest part of the card
turn the card the other way and score at 2 cm, 2.5, 15 cm and 15.5 cm.
Cut out the corners.
Add some double sided tape to the small flap at the bottom, and down one of the side,
fold the sides in first and fix together, then do the bottom.
There you have it.. a cute explosion box card with an envelope.
Thanks for coming to take a look!
Hope you enjoyed
Laura x