
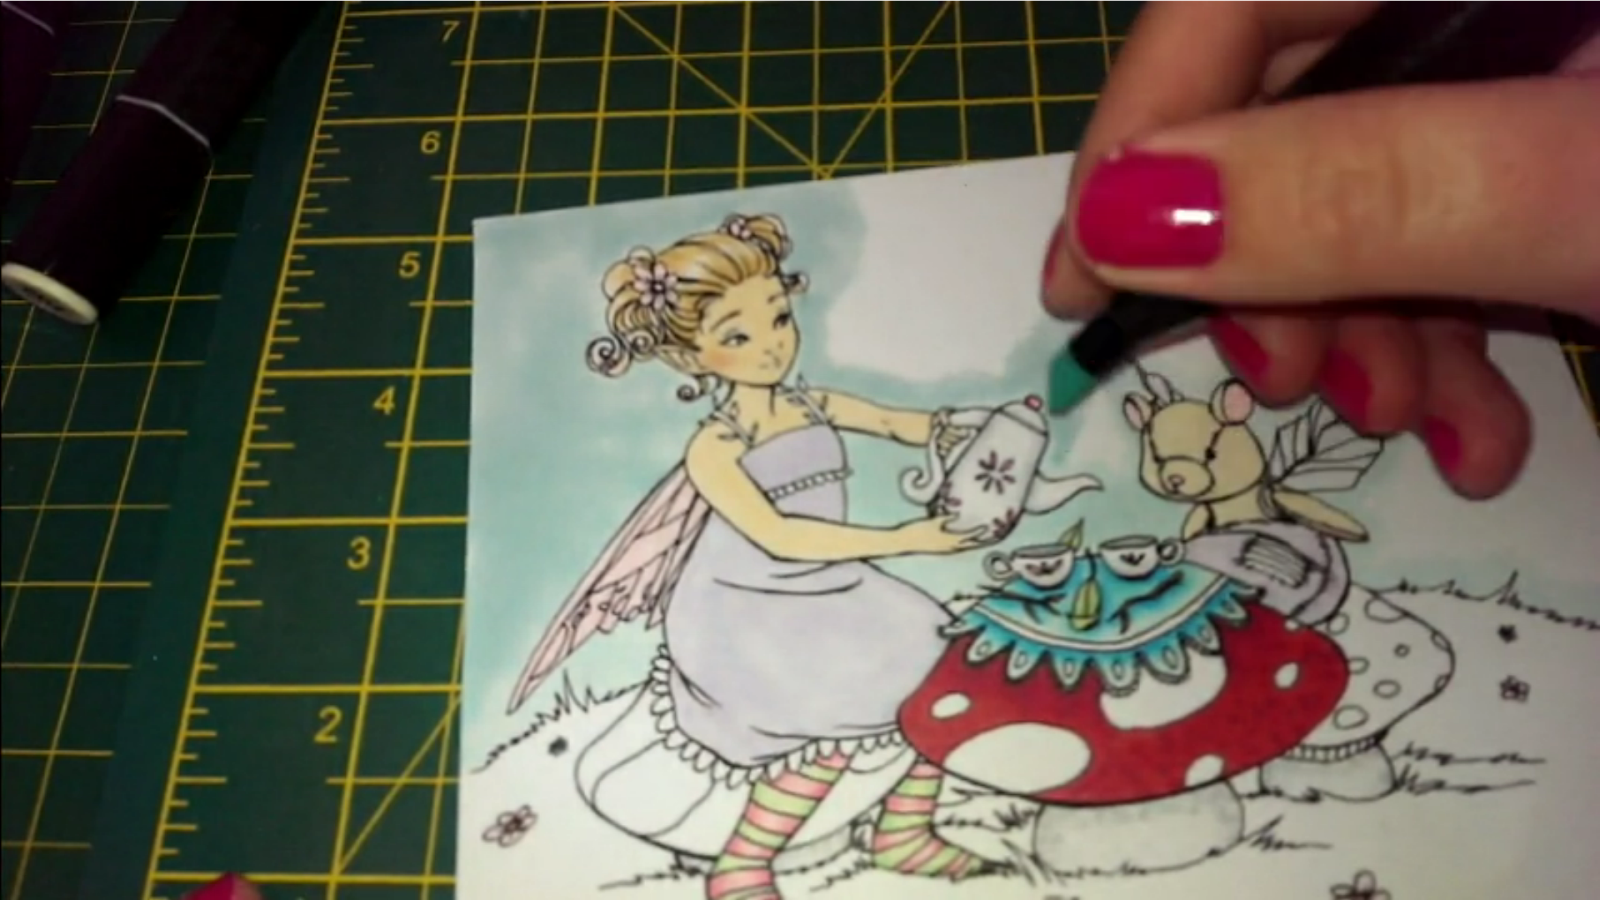
Hey back again, today I'm going to be going in to a little detail about colouring with my spectrum noir pens and pencils, but first things first I just want to tell you about the image I have used, this image is called Time For Tea, its an absolutely beautiful image of a fairy having a tea party with her teddy bear, I purchased this digital image from the crafts and me website www.craftsandme.co.uk
please go over and check out there shop, they have some stunning images and they are brilliantly priced as well.
ok so back to the colouring. I took the spectrum noir colouring accreditation test some time last year, and I love the pens (but to be honest they are the only ones I have tried so I haven't really got a compassion). Sometimes I will admit I have a little trouble getting the pens to blend (I don't know if anyone else has this issue maybe its just me) so I tend to stick to the same colour combo's, so what I tend to do now is combine the pens and pencils and I feel I achieve the outcome that I'm looking for.
Smooth Blend


Teddy, ears and wings EB1, PP1, IB1
I started first by laying down the base colour, with most of the colouring I was doing a smooth blend I then go back with the pencils and add the detail.
Stripy Tights

PP1, PP3, PP5 & LG4, LG2, LG1
To do her tights I first started off with PP1 colour then added the PP5 on each side of the stripe, then went in with the PP3 and finished off PP1 just to blend the mid tone to the lightest colour. (I love the effect it gave to her tights)
Table cloth & mushrooms


Table cloth IB1, IB2, IB3 Mushroom CR8, DR4, DR6


Stalks and teapot and cups GG1 GG2 GG3 and the blender
The table cloth and mushrooms where done in both the same way, I started by laying down the lightest colour, then adding the darkest where I thought the shadow should be, I used the mid tone to blend in the darker shade and finaly back to the lightest shade to blend the mid tone in. Once all the blending was done I decided I wanted some texture on the mushroom, Using all the reds starting dark to light, Adding little dots all over the mushroom. The stalks I done in the same way but starting with GG1 dotted all over, Then GG2 I didn't bring out as far, and GG3 I kept to the edge where I thought the shadowing would be, just to finish off with the blender dotting it all over to tone down the harshness of GG3 and bring the three colours together.
The tea pot and cups I started by laying down the blender in the centre, adding GG1 and bringing out to where I had added the blender so GG1 would virtually disappear, switching to GG3 to add just a small suggestion where I felt the shadows should be and finaly to GG2 to blend the two colours together.
Hair

Hair GB 2 and GB8
I started with GB2 and flicked it in, Starting with her hair line and ending in the centre of her hair, doing the same starting with the back of her hair flicking in to the centre, ensuring I was leaving the centre white to give the illusion of a shine line, Then with GB8 doing the same thing but making sure I wasn't adding to much.
The sky
I decided I didn't want to add to much detail to the background and wanted to keep it pretty simple, when I had done a test for the video, I had down the sky is TB1, but when I came to do the video I picked up the wrong colour (IB1) but I don't think it looks to bad.
Adding the pencil
The dress


The main thing I want to talk about with adding the pencil is her dress and the grass, so starting with her dress, I started by taking the darker colour and mapping out where I wanted some of the dress folds to be more prominent, also not forgetting to add the shadowing.
then taking the mid tone and adding on the edge of the darker colour and taking it up to where the lightest colour was going to start, Using a paper stump and the blending fluid to bend all the colours together I had to go over it again with the darker colour just to make the dress folds stand out.
The Grass


I started off with the darkest colour and coloured all the drawn lines then shaded underneath and under all the flowers, Using all the blending fluid and a paper stump draw the down in to the white.
Once you have down that and your happy with it, use the lighter green and draw some random grass tuffs blend them slightly and repeat, then finally go over them in the darker colour.
and just to finish the picture off I used some clear embossing powered mixed with glitter and perfect pearls mixed together and put it on her wings, her dress and the teddy's wings (because every little fairy needs a little sparkle)

I was really please with that way it came out, and I have a project in mind that I will be perfect for.
I hope you enjoyed this
Please feel free to leave me a comment
Happy Crafting!
Colouring list
Fairy
Wings: PP1, 35, 29
Dress: HB1, 82, 80, 78
Tights:LG4, LG2, LG1
PP5, PP4, PP1
PP5, PP4, PP1
Skin: FS1, CR3, 8
Teddy: EB1, 95
Wings: IB1, 74
Nose & Ears: PP1, 35, 29
Pillow: HB1, 82, 80, 29
Patch: LV2, BP7, JC1, TB4, OR3
Mushrooms: DR6, DR4, CR8, 33,27, 24
Stalks: GG3, GG2, GG1, BLENDER
Grass: 60, 47
Flowers: PP1 35, 29
Table cloth: IB3, IB2, IB1
Leaves & Twigs: LG4, LG2, LG1, EB3
Cups and tea pot: PP5, GG3, GG2, GG1, BLENDER

